|
|
|
|
Contact:
![zenseeker [at] hotmail [dot] com](EmailImage.gif)
|
Alcohol Stove Construction Introduction Step 2b - Pressurized Jet Stove |
Now you must decide how you will put the two cans together. Before you start, ensure that the inside of the wider (or soon to be wider) section and the outside of the narrower section are roughened up with fine sandpaper or steel wool. The edges of the top and bottom sections should be clean and smooth if you want them to fit together without any problems. SOS pads and water work great for smoothing/polishing rough edges.
One important trick is to bring the edge of a wider section just slightly over the narrower section and tape it there, then carefully get the rest of the wider section over the narrower one. A shim made of a short length of aluminum from the side of a can with a rounded and polished tip may be required to accomplish this.
![]()
Techniques
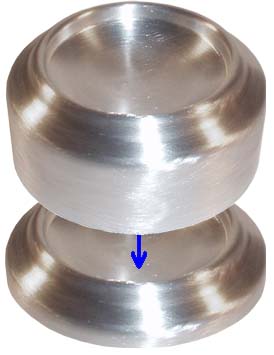
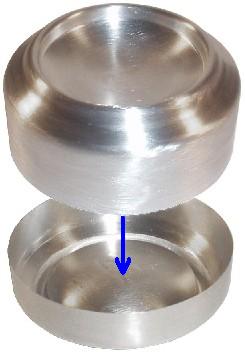
Different Diameter Cans - If you chose two different cans of different sizes, you only need to carefully put them together and need to stretch or cut either part. You may need a shim for this technique.
These include:
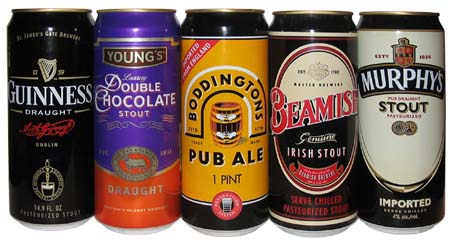
Top (bigger) - 12 oz PepsiCo (Budweiser, Lipton’s Ice Tea, Mountain Dew, Mug Root Beer, Pepsi, Sierra Mist, or Slice)
Bottom (smaller) - 14.9 oz Guinness (Origional, Draught, Draught Bitter), Young's Double Chocolate, John Smiths (Extra Smooth, Original Bitter and Smooth Bitter), Boddington's (Pub Ale and Draught Beer), Beamish Irish Stout, Caffrey’s Irish Ale, Murphy’s (Stout, Irish Stout and Draught Stout), Stone Bitter, Tetley Draught Bitter, Worthingtons Draught Bitter or Newcastle Brown Ale.
or
Top - 8.3oz Red Bull (bigger)
Bottom 5.5oz V8 (smaller) - not all cans will work. One way to test is to cut out your top section and test fit it over the bottom of a V8 can - if it slides snuggly over it without stretching, you're good
or
Larger
Narrower
12oz aluminum drink can (tight fit)
Budweiser
Lipton’s Ice Tea
Mountain Dew
Mug Root Beer
Pepsi
Sierra Mist
Slice
etc.
14.9 oz Guinness (Original, Draught, Draught Bitter)
Young's Double Chocolate
John Smiths (Extra Smooth, Original Bitter and Smooth Bitter)
Boddington's (Pub Ale and Draught Beer)
Beamish Irish Stout
Caffrey’s Irish Ale
Murphy’s (Stout, Irish Stout and Draught Stout)
Stone Bitter
Tetley Draught Bitter
Worthingtons Draught Bitter
Newcastle Brown Ale
8.3oz Red Bull
5.5oz V8
2 5/8oz Sterno (loose fit)
4oz Del Monte Can Fruit (Steel-tight fit)
3oz Cat food
Hormel Spam Spread
etc.
7oz cat food
chip dip
24oz Heineken
25.4oz Fosters
5.5oz V8 (tight fit)
8.3oz Red Bull (easy fit)
6oz Tomato Paste (unridged tin can such as Hunts) (Steel)
4.5oz Toast Toppers (Steel)
etc.
12oz Drink
10 3/4oz Soup (Steel)
4oz Mushrooms (Steel)
etc.
15 1/4oz Soup (Steel)
11oz Mandarin Oranges (Steel)
24oz Beer
Arizona Drink
12oz drink
18oz Elements Energy Drink (very thick)
3oz Steel can with ridged bottom
Underwood Deviled Ham
Bumblebee tuna
103/4oz Soup can (Steel)
3oz Tuna can with rounded bottom
12oz Pepsi One
12oz Dr. Pepper
Stretching - (see dilator tool) You can stretch the bottom can by forcing an unopened can straight down into your bottom section 1-2 times. The pressure of the trapped air in the section you are stretching should force it right off on its own. Should it become stuck, the easiest way to remove a stuck can from your stretcher is by heating it just a bit with a butane torch - it should pop right off (don't blow yourself up or start your house on fire!). Other options include using cooking oil for lube, grabbing with rubber gloves and nudging the edge of your stove piece with the rolled edge of a tin (such as a Altoids Tangerine Sours lid).
For an easier less problematic fit, you may want to cut out another bottom (or trimmed down top) slightly longer than the bottom you want to stretch, cut off its bottom ridge (optional) and force it on the full can with vegetable oil to make a wider diameter tool (you shouldn't need a shim during assembly).
OR
Then
Note - You should only try stretching prior to making any holes in the part you want stretched as pressure from the trapped air will help you remove the stretched part. Woe is the person who has invested a great deal of time cutting and drilling a stove part to end up with it stuck to another can or crushed in an attempt to pull it off. If you are stretching the top section of an open jet stove and decide to cut out the large center hole prior to stretching, you may want to use two protected fingers as a hook in the center hole to slowly nudge the stove up off of your stretcher tool little by little (hope you did a good job of smoothing out that razor sharp edge). Grabbing your stove and trying to force it off frequently results in a crushed handful of aluminum.
Optional - An empty can filled with plaster of Paris may be used in lieu of an unopened can. This gives you a safer option for using heat from a stove top or torch and to provide a firm support for stretched can bottoms that need other modifications. It can also be heated without exploding
Dangerous Advanced Heating Technique - If you heat a can bottom pressed onto another can without a hole in it, you can expect it to pop off like a champagne cork. This may be used in your favor if you would like to intentionally use heat to assist in removal of a stuck can bottom (slowly and lightly heat with a butane torch while holding your hand above the can bottom), otherwise a pressure relief hole is required in either the stretcher tool or the part being stretched.
NOTE: Use of an unopened can with heat is not recommended as the built up pressure in the can may cause it to explode (but will most likely just invert the bottom depression with a sudden and frightening POP! before exploding). If you are using the heating technique, either use an empty can or one filled with plaster.
Use a gas stove or torch to heat your assembly until the coloring of the can begins to fade, you see smoke, or you smell it burning (the transparent coating on and in your can will brown, smoke and eventually burn off if heated long enough). Once you reach this point, run some cold water over your hot can which should now be permanently stretched (about equal to cold stretching with one additional can layer). If you cannot remove your can section from your tool, repeat this step until you are able to so so. Don't burn yourself, or your house down, in the process.
Don't overheat your parts as this will weaken your stove.
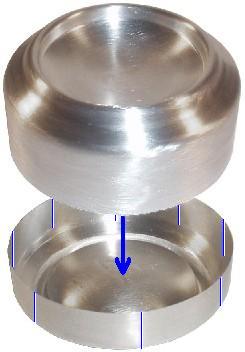
Slits - You may cut 8 evenly spaced vertical slits in the side of the bottom (as shown below) or top section (which would be less likely to leak if you do a poor job of sealing). Cut from the edge to as far as your cans will overlap or max to about 3mm from the shoulder of the can. Placing the slits on the bottom section, compared to having them on the top section, decreases the likelihood that the sealing epoxy will ignite from the flames (especially if you make a Side Burner stove).
You may need a shim to help line everything up just right.
Options -
Slits on outside - You are less likely to damage/deform your two sections by sliding the slitted section over the unslitted section. This does require more sealer and may be less esthetically appealing if you are sloppy with epoxy.
Slits on inside - Done right, forcing the slitted section into the unslitted section may provide you with a exopyless seal (sealer still recommended) but may deform and/or cut the outside section. Best results are when the outside section is made from steel or thick aluminum.
Crimping (Not Recommended) - If you want to try putting two similar can bottoms together without stretching, use a crimper (see templates) to make smooth crimps around the edge of your bottom section causing the edge to bevel inwards and allow it to tightly slip into the top section.
→
Once you get the bottom section started into the top, you may use a block of wood and a hammer to carefully tap around the bottom section until it is seated where you would like it in the top section. If at any time the side wall of your bottom section folds or crimps, creating a potential leak, give up and make a new bottom section. Soapy water may help ease assembly. Done right, you don't need any sealant, but it wouldn't hurt. The long term seal of this system after the stove has been heated and cooled repeatedly is questionable.
Top Section Height
12oz can
-7mm*
6oz can
-3mm*
*Compared to inner wall height
This technique works best if the outer can section overlaps the inner can section all the way to the point where the sidewall of the inner can starts to curve inward. The area where the sidewall starts to curve is sturdy enough to support the pressure from the unstretched can without creating a undesirable fold and causing a leak.
Rounding (Not Recommended) - Similar to the crimping technique, you shape the edge of the bottom section to allow it to slip into the top section. Place many many inward bends (give the slightest little bend inwards with your thumb and forefinger or needle nose pliers and avoid making sharp bends that will cut the other section when you slide it over) on the edge of your bottom section causing the edge to round and allow it to tightly slip into the top section. Use a file to remove any sharp protrusions that might cut the top section.
Once you get the bottom section started into the top, you may use a block of wood and a hammer to carefully tap around the bottom section until it is seated where you would like it in the top section. If at any time the side wall of your bottom section folds or crimps, creating a potential leak, give up and make a new bottom section. Soapy water may help ease assembly. Done right, you don't need any sealant, but it wouldn't hurt. The long term seal of this system after the stove has been heated and cooled repeatedly is questionable.
This technique works best if the outer can section overlaps the inner can section all the way to the pont where the sidewall of the inner can starts to curve inward. The area where the sidewall starts to curve is sturdy enough to support the pressure from the unstretched can without creating a undesirable fold and causing a leak.
Cupping (Not Recommended) - you may stretch the first 2mm of the top section over an unopened can, a double can stretcher or a cup with a rounded bottom to widen the lip just enough to start the bottom section in top section.
→
Very carefully and evenly push the bottom section in until it is set where you would like it. You may need to tap around the edge of the bottom section to get it where you want it. If at any time the side wall of your bottom section folds or crimps, creating a potential leak, give up and make a new bottom section. Soapy water may help ease assembly. Done right, you don't need any sealant, but it wouldn't hurt. The long term seal of this system after the stove has been heated and cooled repeatedly is questionable.
This technique works best if the outer can section overlaps the inner can section all the way to the pont where the sidewall of the inner can starts to curve inward. The area where the sidewall starts to curve is sturdy enough to support the pressure from the unstretched can without creating a undesirable fold and causing a leak.
Inverted Bottom Compression Fitting (Not Recommended) - Trim down a bottom of one can so that just a small portion is left of the sidewall adjacent to the shoulder of the can. Take your other can and press it over the inverted bottom as shown in the picture below. Done right, you don't need any sealant, but it wouldn't hurt to add some. The long term seal of this system after the stove has been heated and cooled repeatedly is questionable. Denting of the exposed edge may also cause a leak.
This method is based on Scott Marquardt's Convex Top Coke Stove.
This option has its applications, such as for tops of open vented/chimney stoves where the top gets too hot for JB Weld or High Temperature RTV, and where an airtight seal isn't absolutely necessary.
If you would like to keep the two stove sections together without them slipping, you can try a sealant to glue them together or carefully poke a couple of holes with a pushpin through where the two sidewalls come together.
Wick (Optional) -
Some folks opt to add fiberglass insulation, perlite or something similar between the inner and outer wall of their stoves. This helps soak up fuel and decreases the amount of fuel spilled when the stove is tipped over. Depending on how the wick is used it can increase vaporization of alcohol or decreases it. A wick does affect the performance of a open flame stove, but is very questionable for jet stoves that are closed off.
Sealing -
After a careful test fit, clean parts with alcohol and and use a toothpick to mix up some J-B Weld. Spread a thin coat of epoxy evenly around the inner side wall of the larger section.
Option - High Temperature RTV will work to seal your stove, but isn't an epoxy like J-B weld. It is easier to use, cheaper but lacks the strength that may be needed if you decide to set very large caldrons on your stove (which isn't recommended). It may also take longer to completely vulcanize if you use much more than you need. You should wait at least 24 hours before testing your stove and several days before you try any durability tests (determining the break point).
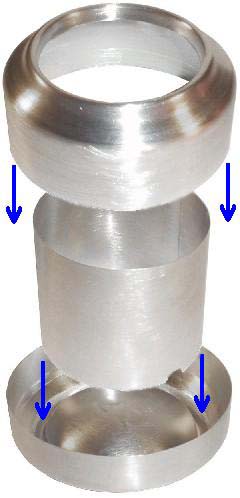
If you are making an open jet stove, hybrid SideBurner stove or adding an inner cylinder to your pressurized jet stove (for structural integrity), this is the time to insert the inner cylinder. Just fit the inner tube in the circular fissure in the inside of the top piece facing down and carefully bring the bottom piece over them (opposite in the picture below). A small bead of epoxy may also be applied inside the circular fissure of the top piece (or later after construction is complete) to give it a better seal.
Note - if you are putting together an open jet stove, it is actually easier to perform this step upside down.
Now carefully insert the narrower section into the wider section. (See tape and shim trick at beginning to this step). Then after you get the stove sections started over each other, smear on a light coat over the inner section for some added sealing. If you have an inner tube, take care that you don't crunch it during assembly and you may also want to place a book on top of your stove while the epoxy is hardening to ensure that the inner tube stays firmly seated.
If you used the slit method, you must add a bead of epoxy over each of the slits to ensure a good seal.
Clean any epoxy with a paper towel. Wait 6 hrs then put it into a 250°F oven for 3-4 hours to finish curing the epoxy or wait 24 hours to completely harden at room temperature.
Proceed to Step 5 - Final Touches