|
|
|
|
Contact:
![zenseeker [at] hotmail [dot] com](EmailImage.gif)
|
Alcohol Stove Construction Introduction Step 2b - Pressurized Jet Stove |
The measurements of 2cm (bottom) and 3cm (top) work, but you can lengthen or shorten these measurements to make taller or shorter stoves or to move the overlap point up or down. Just make sure to adjust the width of your inner wall if you are using one.
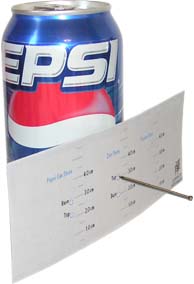
Marking Method - Take a card, square piece of sheet metal (flashing scrap from pot stand) or block of wood and poke or drill two holes in it, one at 2cm and one at 3cm from the bottom edge. You can use a card template (template is designed to be printed with Internet Explorer or Paint and other image programs may print magnified images) to mark your card.
Examples marking at the 3cm height
Set the can you've been working on upright (bottom of can down) and place the card next to it. Use a pen, pin, tack, needle, etc. in the 3cm (top section) hole to mark the can as you carefully rotate it one or two revolutions. Do the same with a different can at 2cm (bottom section).
Example using 6oz cans
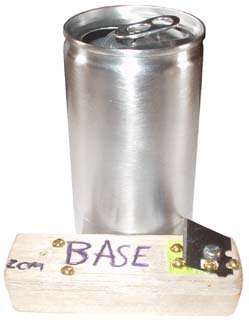
Scoring Method - Alternately, you may firmly set/screw a utility blade or pen on a block of wood or in a book about the size you need and rotate your can against this. If you have a sturdy platform, you may rotate it around your can once or twice and use this score line to make a clean tear or just use the mark to guide cutting with scissors.
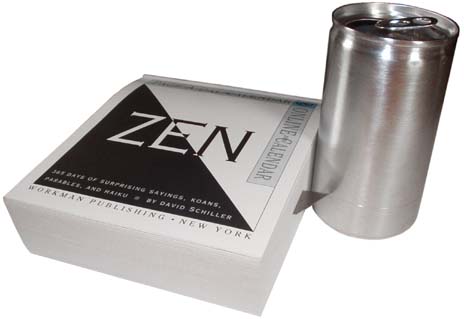
Paper Template Method - Warp and tape a long sheet the paper cut to desired width (Graph paper works great) around your can to use as a cutting guide. If you tape the template to itself so that it is wrapped snugly around your can while being able to it side up and down, you can set the can bottom side down and move the tube template down until it bottoms out - secure it to that position with tape and trim.
Plastic Bottle Jig
Plastic Bottle Jig Method - Find a bottle or pipe that your can fits snuggly in (use cardboard skims as needed). Mark the bottle and poke a hole in it at the proper height(s). Use a pen, pin or knife to mark or score an even line around your can by simply twisting your can in the jig while holding the marking/scoring device level. See Deems Burton's Can Cutting Jigs for more information.
Using metal snips or a good set of scissors (better of the two), starting at the top of the can, cut diagonally down to your scribe lines on both cans.
Use fine sandpaper, steel wool or SOS pads to smooth out the edges, as they may be razor sharp.
Tables provided for those who may want to make a stove taller or shorter than the example (40mm inner wall).
|
|
Minimum Section Height |
Inner Section Max |
Outer Section Max |
SideBurner Top Min |
SideBurner Bottom Max |
Stove Height |
|
12oz can |
11mm |
-9mm* |
-7mm* |
20mm |
-16mm* |
+2mm* |
|
5.5oz can |
7mm |
-4mm* |
-3mm* |
20mm |
-16mm* |
+1mm* |
|
|
*Compared to inner wall height |
|||||
|
Balsa Block Conversion Table 1 |
|||||
|
# 1/8" |
|
inch |
mm |
1/8 |
1/2 |
|
1 |
1/8 |
0.125 |
3.175 |
1 |
|
|
2 |
1/4 |
0.250 |
6.350 |
2 |
|
|
3 |
3/8 |
0.375 |
9.525 |
3 |
|
|
4 |
1/2 |
0.500 |
12.700 |
|
1 |
|
5 |
5/8 |
0.625 |
15.875 |
1 |
1 |
|
6 |
3/4 |
0.750 |
19.050 |
2 |
1 |
|
7 |
7/8 |
0.875 |
22.225 |
3 |
1 |
|
8 |
1 |
1.000 |
25.400 |
|
2 |
|
9 |
1 1/8 |
1.125 |
28.575 |
1 |
2 |
|
10 |
1 1/4 |
1.250 |
31.750 |
2 |
2 |
|
11 |
1 3/8 |
1.375 |
34.925 |
3 |
2 |
|
12 |
1 1/2 |
1.500 |
38.100 |
|
3 |
|
13 |
1 5/8 |
1.625 |
41.275 |
1 |
3 |
|
14 |
1 3/4 |
1.750 |
44.450 |
2 |
3 |
|
15 |
1 7/8 |
1.875 |
47.625 |
3 |
3 |
|
16 |
2 |
2.000 |
50.800 |
|
4 |
|
17 |
2 1/8 |
2.125 |
53.975 |
1 |
4 |
|
18 |
2 1/4 |
2.250 |
57.150 |
2 |
4 |
|
19 |
2 3/8 |
2.375 |
60.325 |
3 |
4 |
|
20 |
2 1/2 |
2.500 |
63.500 |
|
5 |
|
Balsa Block Conversion Table 2 |
||||||
|
# 1/16" |
|
inch |
mm |
1/16 |
1/8 |
1/2 |
|
1 |
1/16 |
0.063 |
1.588 |
1 |
|
|
|
2 |
1/8 |
0.125 |
3.175 |
|
1 |
|
|
3 |
3/16 |
0.188 |
4.763 |
1 |
1 |
|
|
4 |
1/4 |
0.250 |
6.350 |
|
2 |
|
|
5 |
5/16 |
0.313 |
7.938 |
1 |
2 |
|
|
6 |
3/8 |
0.375 |
9.525 |
|
3 |
|
|
7 |
7/16 |
0.438 |
11.113 |
1 |
3 |
|
|
8 |
1/2 |
0.500 |
12.700 |
|
|
1 |
|
9 |
9/16 |
0.563 |
14.288 |
1 |
|
1 |
|
10 |
5/8 |
0.625 |
15.875 |
|
1 |
1 |
|
11 |
11/16 |
0.688 |
17.463 |
1 |
1 |
1 |
|
12 |
3/4 |
0.750 |
19.050 |
|
2 |
1 |
|
13 |
13/16 |
0.813 |
20.638 |
1 |
2 |
1 |
|
14 |
7/8 |
0.875 |
22.225 |
|
3 |
1 |
|
15 |
15/16 |
0.938 |
23.813 |
1 |
3 |
1 |
|
16 |
1 |
1.000 |
25.400 |
|
|
2 |
|
17 |
1 1/16 |
1.063 |
26.988 |
1 |
|
2 |
|
18 |
1 1/8 |
1.125 |
28.575 |
|
1 |
2 |
|
19 |
1 3/16 |
1.188 |
30.163 |
1 |
1 |
2 |
|
20 |
1 1/4 |
1.250 |
31.750 |
|
2 |
2 |
|
21 |
1 5/16 |
1.313 |
33.338 |
1 |
2 |
2 |
|
22 |
1 3/8 |
1.375 |
34.925 |
|
3 |
2 |
|
23 |
1 7/16 |
1.438 |
36.513 |
1 |
3 |
2 |
|
24 |
1 1/2 |
1.500 |
38.100 |
|
|
3 |
|
25 |
1 9/16 |
1.563 |
39.688 |
1 |
|
3 |
|
26 |
1 5/8 |
1.625 |
41.275 |
|
1 |
3 |
|
27 |
1 11/16 |
1.688 |
42.863 |
1 |
1 |
3 |
|
28 |
1 3/4 |
1.750 |
44.450 |
|
2 |
3 |
|
29 |
1 13/16 |
1.813 |
46.038 |
1 |
2 |
3 |
|
30 |
1 7/8 |
1.875 |
47.625 |
|
3 |
3 |
|
31 |
1 15/16 |
1.938 |
49.213 |
1 |
3 |
3 |
|
32 |
2 |
2.000 |
50.800 |
|
|
4 |
|
33 |
2 1/16 |
2.063 |
52.388 |
1 |
|
4 |
|
34 |
2 1/8 |
2.125 |
53.975 |
|
1 |
4 |
|
35 |
2 3/16 |
2.188 |
55.563 |
1 |
1 |
4 |
|
36 |
2 1/4 |
2.250 |
57.150 |
|
2 |
4 |
|
37 |
2 5/16 |
2.313 |
58.738 |
1 |
2 |
4 |
|
38 |
2 3/8 |
2.375 |
60.325 |
|
3 |
4 |
|
39 |
2 7/16 |
2.438 |
61.913 |
1 |
3 |
4 |
|
40 |
2 1/2 |
2.500 |
63.500 |
|
|
5 |
Proceed to Step 4 - Assembly


