|
|
|
|
Contact:
![zenseeker [at] hotmail [dot] com](EmailImage.gif)
|
Alcohol Stove Construction Introduction Step 2b - Pressurized Jet Stove |
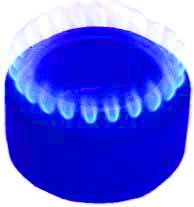
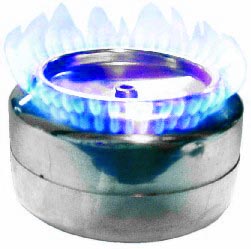
Test fire your stove and note that you may need to lower a pot to within an inch over the lit stove to get it to light all of the jets. As needed, sand and apply a bead of epoxy over any leaks and/or run a needle or drill bit (by hand) through any jets that didn't fire up like the ones next to it.
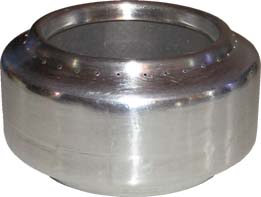
If you built a pressure jet stove, you will need a primer pan
Optional Performance Touches for open jet stoves
You may squeeze in some J-B weld or High Temperature RTV in the gap between the top of your inner cylinder and stove (open jet stove) to seal any leaks. You may use a toothpick, a Q-tip or your finger.
You may paint the walls of the center fuel port black to possibly help it absorb heat during warm-up (unlikely a noticeable amount). Counter intuitively, the regular 1200°F barbeque paints that can be cleaned up with alcohol seem to work fine. Just avoid soaking your stove in alcohol for extended periods followed by rubbing it with steel wool. This also makes score lines (with knife, nail, needle, etc.) for measuring lines easier to see and if you are fancy, you can just paint on the measuring lines (spray some paint in its cap and use brush, tape off section and spray or use high temperature paint markers).
If you like, you may try some toxic aluminum bluing from a gun store on the inside of your fuel chamber. This isn't recommend for the outside of your stove as it may feel quite nasty (depending on what type you use).
Optional Aesthetic Touches
Stove wrapped in flue tape
3M High Temperature Flue Tape (regular foil tape is only rated at 200° to 300°F and will melt a bit and emit a toxic odor when using the stove) may be trimmed and used to cover the sides of your stove. This may also help to evenly distribute heat in the stove.
Stove wrapped in Blue Tommy Tape
Hi temp silicone tape such as Tommy Tape may be used for a colorful touch.
Stove painted with Blue 1200°F ceramic paint
Hi temperature paints found in hardware and auto supply stores as well as high temperature markers are other options. If you used RTV and wiped it all over your stove (even if you can't see any), you will have problems painting unless you clean it off first (steel wool, sandpaper, SOS pad, etc). Using a different color high temperature paint as a base layer and/or preheating your stove in the oven before each light coat might help your paint stick and not run. It is important to understand that not all paints are created equal. Paint varies in heat resistance, durability and resistance to flames and you'll have to experiment to get the right setup for you. For example - Rustoleum high temperature black paint is good at resisting flames on a sideburner stove, while some other paints blister, but Rustoleum isn't as tough as some of the ceramic paints at resisting scratches.
If you are getting really fancy, you may cover the seam between the two can bottoms with J-B weld, let harden, and sand smooth. This is give your painted stove a really nice look.
Stove polished with SOS pad
Metal polish, steel wool, SOS pads, buffing wheels or sandpaper can give you different metal looks from brushed to extremely polished. If you want to strip the coloring off the outside of your stove, it is much easier to do so before opening your drink cans (as you are able to firmly scrub it without crushing it). Just remember what was in the now unidentifiable can before you offer Aunt Mary a cool drink.
Polishing the bottom part of a stove to a mirror image will create a concave mirror that may be used for fire starting. See Fire from a Can of Coke and a Chocolate Bar.
If you built a pressurized stove or want better cold weather performance -
Proceed to Build a Primer Pan