|
|
|
|
Contact:
![zenseeker [at] hotmail [dot] com](EmailImage.gif)
|
Alcohol Stove Construction Introduction Step 2b - Pressurized Jet Stove |
Decide what type of alcohol stove you want to construct (see Alcohol Stove Types for more information):
Open Jet stove - go to Step2a - these are very simple to light (don't require priming) and are easier to simmer with.
or
Hybrid Sideburner Jet stove - go to Step2a - these are a little more difficult to light and are difficult to simmer with. They are made with jets on their sides and the stove doubles as their own pot stand. A primer pan isn't needed, but would help ease lighting.
or
Pressurized Jet stove - go to Step 2b - these tend to burn hotter, boil faster and are more fuel efficient. You'll need a primer pan and simmering isn't always possible.
or
Chimney and Low Pressure Sideburner stove - go to Step2c - these tend to be similar in design and may be more reliable than stoves with jets. These may or may not need priming, depending on design.
or
Open Flame stove - read Step2a, Step 2b and Step2c for basic concepts - these tend to be more reliable than other alcohol stove designs and vary widely in fuel efficiency. There're so many variations of these stoves that stove makers are only limited by their imaginations and fabrication skills. For ideas, browse through the various stove pages on this site as well as many of the stove designs linked to on the Links page.
Note:
If you are making a Pressurized Jet Stove - skip this subsection and go to Step 2b.
If you are making a Chimney stove - skip this subsection and go to Step2c.
If you are making a Low Pressure Sideburner stove - skip this subsection and go to Step2c.
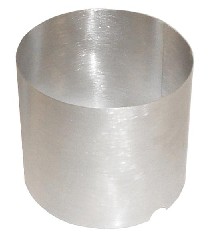
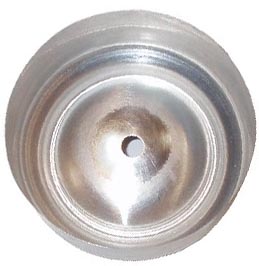
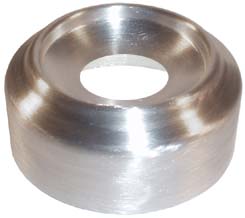
Center Hole Construction -
You will need a large central opening for filling your fuel and for preheating your stove. See How Stoves Work for more information.
Note - This is easier to do with a can that hasn't been cut down yet. If you have already cut down your can (in order to stretch it) you can lightly fit it over another can (try not to force it on and get it stuck) to protect the easily bendable sides of the can.
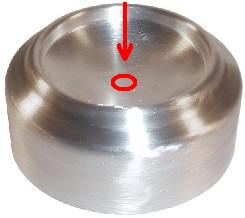
Basics Hobby Knife Method - Cut out the center section by running a utility knife around and around the inner base of the circular ridge. At a certain point, you will be able to press the center section out with your thumb or back of the knife.
Poke Method - carefully scribe around about two revolutions with a hobby knife (though a utility knife might be more durable) and very carefully start a cut with the tip of your hobby knife about 1-2mm at a time, until the center depression is ready to be pushed out with the back of the knife handle.
Note - if you are not skilled with a hobby knife or this method, there is be a good chance that you might push the knife blade through your other hand. This method is not recommend unless you are quite skilled with your knife.
Hole Saw Method - Another method is to use a 1 3/4 inch hole saw for 12oz drink cans. This doesn't give as clean a cut as a good scribe line from a blade, especially if you use a power drill, but it is much faster and easier. If your saw fits snuggly in the depression (remove guide drill if attached) and twist by hand. If it's too loose or tight, you may drill a guide hole (template may help you center a mark for a hole) in the center of the depression and carefully drill out the center with a power drill (should only be done by persons trained and experienced with power tools and techniques).
Note - different brands of cans have different inner rim diameters and hole saws may also slightly vary in size. Coke cans generally have larger center sections than Pepsi cans and are more suitable for use with a 1 3/4 inch hole saw.
 →
→
 →
→
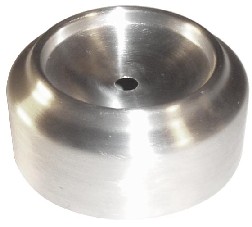
Sand and smooth out your new hole with sandpaper, steel wool or SOS pads (the cut edges may be razor sharp).
Cut a rectangle out of the sidewall of a can to at least 180mm by 40mm (for stoves made of 12oz drink cans). Print a copy of the template, cut out the inner wall template and tape it to your aluminum sheet. Cut out your piece. Make weep holes by using a hole punch to punch out the three evenly spaced 2.5mm notches on your bottom edge. Alternately, you may make two cuts 2-3mm apart and bend the notches toward the outside of the tube to form your three weep holes.
Note:
The template works on most popular cans, but ideally, you should check fit prior to epoxying, and adjust as necessary.
If you are using different dimensions for your stove (to make it taller or shorter), make sure that the inner wall is at least 10mm taller than the height of the top section (or the section that will be fitted inside the other) for a snug fit. If the inner wall is too short and easily moves, your stove won't work.
There are several techniques to forming your inner wall into a tube.
Slit Method - Using interlocking slits is the strongest method of holding your inner tube together but might be a little more difficult to get that perfect fit if you are using unique cans (i.e. Guinness). The free ends beyond the slits should be placed on the inside of the tube for better strength and to ease sealing. For aesthetics, the free ends may instead be placed on the outer side of the tube, but will require tape, rubber bands or krazy glue to hold them in place if you choose to seal them.
If you would like a little extra pressure to build up in the outer chamber of your stove, you may want to seal the junction of your interlocking slits. Sand the area where the ends will meet (edge to dotted gray line on both sides of template) and clean with alcohol. Using your toothpicks, apply some J-B Weld (or something equivalent) to this area. You can proceed straight to step 3.
Note -
If you placed the free ends of your wall on the outside of your inner wall and would like to seal your stove, you will need to hold the wall together until your sealer sets. Use a rubber band, Krazy glue, tape or clamp it with two Popsicle sticks.
Wait 5 hours and proceed to step 3.
Caulk Tube Method (stoves made with 12oz drink cans) - Sand the area where the ends will meet (edge to dotted gray line on both sides of template) and clean with alcohol. Using your toothpicks, apply some J-B Weld (or something equivalant) to this area. Wrap your soon to be inner wall around a tube of Caulk and wrap a rubber band around it.
Wait 5 hours and proceed to step 3.
Epoxy Method - If you don't use the slits, you may want to mark the overlap borders to use as a guide before removing the template. Carefully tape and test fit you inner wall and then sand the area where the ends will meet (edge to dotted gray line on both sides of template) and clean with alcohol. Using your toothpicks, apply some J-B Weld to this area. Use a rubber band, Krazy glue, tape or clamp it with two Popsicle sticks.
Wait 5 hours and proceed to step 3.
Staple Method - Test fit and staple it. Seal with epoxy if you like and proceed to step 3.
Creased Method - Mike Martin feels that the strongest and and simplest method is to cut out a cylinder of the appropriate height from a soda can. Then crease it into a Cardioid. Then fold it back into a cylinder of the desired diameter by adding a second crease, leaving a small overlap.
Pressed Seam Method - If you have the tools and/or know how, seam the ends together. You can even use this in conjunction with the Caulk Tube Method. Proceed to step 3.
Options
Hi-Temp RTV Silicone Gasket Maker can be used in lieu of J-B Weld to seal your inner wall.
Another option is to build a second tube around the first. This may increase the stove temperature and increase fuel efficiency.
The inner surface can be sanded clean for esthetics or for later application of black high temperature paint which may hasten heating of your stove.
Aluminum bluing can also be used to darken the inner surface.
If you can't wait 5 hours, you may be able to use Krazy glue to temporarily hold the pieces together (it will come apart with heat) while your epoxy sets. Proceed to step 3.
Proceed to Step 3
Note:
If you are building an Open Jet stove and have already made your fuel port, skip this subsection and Proceed to Step 3.
If you are building an Hybrid Sideburner stove and have already made your fuel port, skip this subsection and Proceed to Step 3.
If you are making a Chimney or Low Pressure Sideburner stove - skip this subsection and go to Step2c.
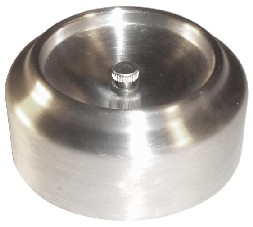
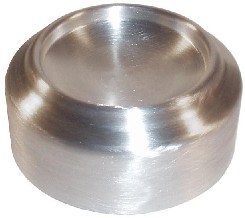
Unless you are using a can that easily opens and seals shut (shoe polish, round candy tin, Sterno can, etc.) to allow for filling with fuel, a small sealable fuel port hole is needed with pressurized jet stoves. Sealing it is necessary to maximize pressure in the stove, avoid wasteful leaks and to prevent the possibility of ignition of fuel inside the stove.
NOTE - Because of the size of this hole - too small to safely vent and too large to work safely as a jet - it must be covered before lighting your stove. If not, it has the potential to blow apart your stove.
Drill out a hole centered in the concave depression of your can. The size of your hole depends on the method you choose to use to seal it (see below) You may want to start with a small hole and enlarge it with a round file or rasp, as larger bits may have problems staying true on the rounded surface of your stove. A hole may also be drilled by twisting the bit with your fingers or by using a hobby knife to enlarge a small hole (drilled or from a hammer, nail and wood dowel). A Unibit also works well at making and enlarging holes in thin metal.
Clean out any burrs with a file, hobby knife, sandpaper, or steel wool.
There are many methods to seal the fuel port hole. See the Pressuring Supplies page for a list of some of the many hardware options.
→
Spring from back portion of ballpoint pen
Self Closing Method - Cut a horizontal slot (the thinner the better) at the midpoint of your screw and find a metal spring that will slide easily over your screw and is too big for your filler hole. Slide your screw through the hole, slide the spring over your screw and epoxy a threaded nut (and washer if needed) on the end of your screw.
→
Spring/Screw assembly not to scale
The spring should hold the screw in the closed position. To fill with fuel, pull the screw halfway out and and lock the slot on the edge of the hole (this should allow enough of an opening for easy fuel filling). When you have finished filling your stove, unhook your screw so that it pulls itself closed.
If you like, you may also grind a notch into the top of your screw to mark which side the your slot is.
Threaded Rivet Method - Use a #8 threaded rivet to seal your hole.
Optionally, you may roughen up the inner surface of the stove and rivet and add a thin layer of high temperature epoxy or silicone to help seal the rivet.
Ball chain coupling
Mounts for chain cut from aluminum flashing.
Circumferential groove ground into neck of screw in lieu of using a nut. Chain from bead shop.
Optionally, you may add a chain (ball chain, id tag chain or jewelry chain) to secure your screw. To do so - rivet a ball chain coupling to your fuel port hole with a threaded rivet (or with a regular rivet in the vicinity of your screw hole), use a nut to attach a chain coupling to your screw, and connect them with metal ball chain. If you intentionally epoxy the nut on your screw with a small gap, the coupler will be able to rotate freely and not bind when you rotate the screw.
View of inside
Expoxyied Nut Method - Clean out any burrs with a file, hobby knife, sandpaper, or steel wool. Roughen up your nut and the area around the hole on the inside of the can (you really should take it down to bare metal with sandpaper as show in the image above), then clean with alcohol. After testing the hole with your screw, epoxy (RTV is not recommended in lieu of epoxy here) the nut with some J-B Weld and set up your can so that your bolt doesn't fall out before the epoxy hardens.
Wait five hours, carefully test to see if the bolt will thread or not. If it doesn't, try to fix it or start over. You may later need to retap the threads of your nut or rivet after the epoxy has completely hardened.
Sheet metal Screw Method - Use a tapered screw to screw directly into the stove.
Heavy Nail Method - Use a steel nail with a head larger than the fuel port hole to drop in the hole. The weight of the nail should decrease the amount of vapors escaping the hole and prevent explosion.
Marble/Pebble Method - Use a marble or an acceptably shaped pebble to fit over the hole. The weight of your marble or pebble should decrease the amount of vapors escaping the hole and prevent internal ignition.
Coin Method - Most any metal coin will work. US pennies newer than 1981 have a higher (97.6% vs. 5%) zinc content and may melt/warp if used.
Tiny Hole(s) Method - Drill/punch one or more jet sized holes in the center depression of you stove to allow fuel to slowly seep in. Sealing the hole(s) is not necessary and will just become centered jet(s) .
Note -
If you are building a side burner stove that will be used to hold up heavy pots, you may want to add an inner wall which will dramatically strengthen your stove (see inner wall construction in Step 2a above) and give you a solid stop point when you press the two outer sections together.
If you choose to use an inner wall with your pressurized stove, you may want to add weep holes to the top of the inner wall or punch out holes in the middle of your inner wall so that pressure doesn't build up in the center chamber and force liquid alcohol out your jets.
Proceed to Step 3
Step 2c Chimney and Low Pressure Sideburner Stove
Note:
If you are building an Open Jet, Hybrid Sideburner, or Pressurized Jet stove and have already made your fuel port, skip this subsection and Proceed to Step 3.
There are many variations of Chimney and Low Pressure Sideburner stoves. Many of these designs have a large exhaust port on the top of the stove and smaller air ventilation ports (which transition to exhaust ports for sideburner stoves) around the perimeter of the stove.
There are several techniques to make an appropriate sized exhaust port on top of the stove.
Large Drill Bit Method - Best result may be made with a drill press and a tapered bit such as a Unibit. Your hole may need cleaning up with sandpaper, steel wool or an SOS pad.
A template or washer may help you center your hole.
Hole Saw Method - How saws can be a bit rough, but may just need some touching up with sandpaper, steel wool and/or an SOS pad.
A template or washer may help you center your hole.
Score and Cut Method - If you have a steady hand, you can score a nice round circle centered on the top of your stove and carefully pop out the exhaust hole. Your hole may need cleaning up with sandpaper, steel wool or an SOS pad.
An appropriately sized (25-40mm) template, coin (US quarter to half dollar size), washer, etc will help guide a nice round circle. Either tape on your guide, or clamp it on with a C-clamp. A compass with a scriber is also a great tool for scoring true circles
→
Since you may want a relatively small upper opening to control your flame, you may need a starter tear to aid in hole cutting. After you have a good circular score line marking the area you would like to remove (shown in blue above), make a second score line (shown in red above) spiraling into the center of the area to be removed. Either drill a hole or puncture the center with a knife so that it connects with the second score line (shown in red above). With the tip of a dull hobby knife, carefully press the inside of the score line starting at your hole so that the score line begins to tear (you may need to help it with a little cut). Follow along the entire score line and once your reach the very end, carefully pull the remainder off without twisting it.
Knife and File Method - You may use a knife to cut out a rough hole and clean it up with a file. A triangular, square, other polygon shape may be easier to make than a symmetrical circle. Scissors also do a fair job of cutting open cans.
An appropriately sized coin, template, washer, etc will help guide a nice round circle. Either tape on your guide, or clamp it on with C-clamps. A compass with a scriber is also a great tool for scoring true circles.
Chassis Cutter Method - There are some commercial tools available that are capable of making clean circular and other shaped cuts. See Hole Making Tools for some ideas.
The smaller air ventilation ports on around the side of the stove can be made by several methods.
Drill Bit Method -The size of ventiatlion holes (3/16" and greater), thin stove material and curved shape make drilling clean holes with a regular drill bit difficult. Best result may be made with a tapered bit such as a Unibit.
Hole Punch Method - If you are able to get a hole punch where you need it, you'll be able to make clean effortless holes where you want them. See Hole Making Tools for some ideas.
Church Key Method - A church key is a can opener that has a triangular pointed end made for piercing the tops of cans. These make effortless holes in the side of cans, but may slightly deform them.
Stab and Jab Method - If aesthetics are not a priority, you can use pointy knives, ice picks, screwdrivers, etc to puncture and enlarge ventilation holes in the side of your stove. You may need to use a file, sandpaper, wrench, etc to remove any sharp edges.
Punch Method - If you can get a piece of wood or something comparable to support the back side of where you want your holes, you can use a punch to make neat holes.
Chassis Cutter Method - There are some commercial tools available that are capable of making clean circular and other shaped cuts. See Hole Making Tools for some ideas.
Proceed to Step 3 - Trimming