|
|
|
|
Contact:
![zenseeker [at] hotmail [dot] com](EmailImage.gif)
|
Alcohol Stove Construction Introduction Step 2b - Pressurized Jet Stove |
There are a few tricks that aren't commonly used, but can alter the performance of your alcohol stove.
Pucking - aka Wide Sides
 →
→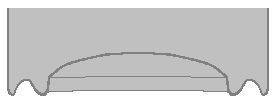
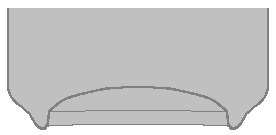
Pucking refers to collapsing the bottom rim of a can so that
it is flush with its sidewall. It allows for a wider platform to set
a pot on and a stove constructed of two pucked can sections resembles a
hockey puck. Pucking also allows for a shorter top section if you
plan to flip it over and compression
fit it into the bottom section.
 VS
VS
To flatten a can section from a 12oz beverage can, place your can section on the ground, slide an empty spray paint can into your can section and press it down until it flattens. This should flatten the bottom rim so that is just slightly higher than the sidewall of that can section. If you would like to make the bottom rim flush or lower than the can section's sidewall, you will either need to carefully hammer the rim down. You can also set your can section on a trimmed down piece of 1.5" pipe, an unopened beverage can or something else as wide as or wider than the bottom rim but narrower than the sidewall and repeat compressing it with your paint can.
Note:
The spray paint can should be empty for safety concerns.
There needs to be a hole in either the bottom of the spray paint can or the can section so that the two pieces don't get stuck together.
A spray paint may be replaced with a good fitting pipe, other can, or rolled up length of sheet metal (steel is better than aluminum).
Notable versions on the net:
Minibull Design A.T., SITH, and the Pocket Puck
Thermal Feedback
Thermal feedback is what keeps the stove vaporizing fuel so that it continues to burn. Feedback can be increased with a well fitted windscreen, pot stand, wider and lower pot, and positioning your jets so that more surface area of your stove is exposed to flames (generally by lowering them).
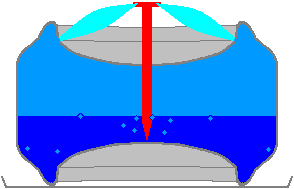
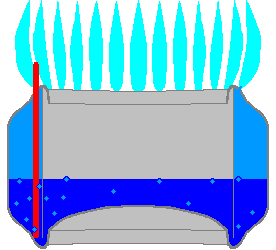
A nail, screw or wire can be dropped into the middle of some stoves or pierced through the top of others so that part of the metal is exposed to flames and part is either touching the stove or fuel.
Notable versions on the net:
Minibull Design - the ISO, NION and the SST
Tinny's Demo Videos - Note - turn speakers down
John (Tinny) Austin's November Blog - Notes on ISO
John (Tinny) Austin's October Blog - Notes on NION
Hideaki Terasawa's Metal "Wick"
