|
|
|
|
Contact:
![zenseeker [at] hotmail [dot] com](EmailImage.gif)
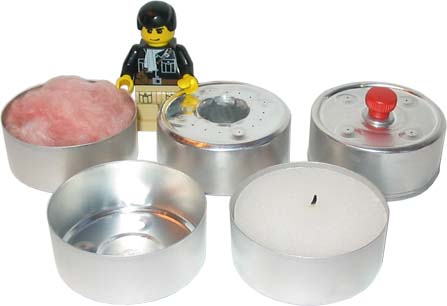
Micro Tealight Stoves can be made from the aluminum dish that holds a tealight (tea cup) candle. The simplest version is simply using an empty candle dish and the more complex ones have inner walls and/or are pressurized. Depending on how you build it, they will hold about a 1/2oz of water (enough to boil 16oz of water, give or take - depending on your setup).
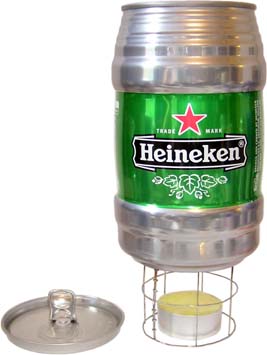
HogOnIce's Homemade Cooking System Alt Link Web Archive
Advantages -
Very Very light.
Good for heating very small pots - such as mugs and Can-Pots made from small cans.
Cheap (100 candles for $2 US)
Drawbacks -
Difficult to construct.
Difficult to fill.
Very very delicate. But if all you have is an empty tealight holder - once crushed, it can be easily reshaped
Small fuel capacity
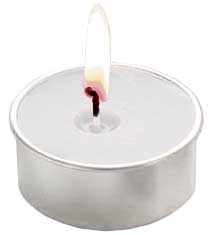
Tealight for simmering
Several can be used together for a slow cook
Construction Tips -
Some building pointers for those wishing to make a tealight stove:
An open flamed stove is the most practical and least complicated stove to make.
Simply use an empty tealight cup
or
Add some fiberglass insulation to an empty tealight cup to prevent spills when filling and moving the stove. This also helps with vaporization in the cold.
or
There are many types of flame resistant (and not so flame resistant) fabric wick options you can place in a tealight cup. Some will require a bit of creativity to keep them in the cup. Some fabrics can be rolled up and stuffed in the tealight cup, while others will need mesh or some form of cover to contain your wick
orIt is also possible to fill your stove with perlite then lay a piece of metal mesh over it and force a second tea light cup with a hole cut in it over the stove to hold it all together. This would be pretty challenging to do.
For fancier stoves with jets and such, you will need to get one tealight cup over another. Since there are several tea light cup manufacturers there is a little variance between the dimensions of each brand of tea light cup. This makes it a whole lot easier for potential micro stove makers to experiment with potentially tiny stoves.
There is no industry standard on the exact size of a tealight cup. Notes on tealight cups from long ago:
Candle Lamp Company tea light cups are a little wider than Florasense cups and they fit together with a slight gap.
Shanti Candle Works make their cups about 3/4 the height of other brands and will fit snuggly inside Florasense cups.
And if you can't find these bands, just head to the store and try to fit different cups over each other.
There is no real good reason to try to fit two identically sized tea light cups together unless you want a real challenge. But if you must, here are a few techniques:
You may be able to find just the right sized can or lid to stretch your tealight over. Smaller tealights may be stretched over a small Ronson 1.3oz Butane can.
Trim off the rolled over edge of the bottom section and carefully force the bottom of another tealight cup just a bit into it so that the top one becomes stuck on the bottom one.. If you are patient you should be able to get a nice clean fit. This may either decrease the capacity of the stove or increase it - depending on design.
Use your finger nails, knife or scissors edge (don't cut it) to make many creases in the side of the inner section. Slide the outer section over it. JB Weld should work to hold everything together.
If you are going to use an inner wall, then first epoxy or superglue it centered in the bottom section. Fill the bottom section with water and place it in the freezer. After the water freezes, smooth off any excess ice that may be on the top of the cup and carefully force your top section onto the bottom. Once you get it where you would like it, let the ice melt, allow it to dry thoroughly and seal it with JB Weld.
The hard method - stretching. burn one tealight so that it melts its candle, extinguish and let harden. Trim off the rolled edge of outer tealight cup and very carefully force it over the wax filled cup. Alternate between this and using your fingers to stretch out your tealight cup until it easily slides over a second tealight cup. Use JB Weld to seal it.
You can cut slits in one of your sections and slide it over or in the other. You will need to use JB Weld to seal it or try flue tape to hold it together.
An inner wall may be made from the sidewall of a pop can. Either wrap it around a pen and epoxy it together or cut tiny slits in it and fit it together. To get it to seal, cut three or four slits through the center of the top section (like cutting up a pie - but just over the inner part of inner wall) and use a pen to force it down around the inner wall and smooth it out.
A resealable fuel port may be made with a threaded rivet or by just making the right sided hole and dropping the right sized bolt in it. A primer pan may be made from a cut down 3oz cat food can.
Also take a look at these pages:
Hog On Ice Heineken Cook System Web Archived Page
Rainmaker's World's Lightest Stove
Chef Glenn's Backpacking Stoves
backpackinglight.com 17909 Big tealight
Jason Klass' Fiberglass cloth stove
Simmerlite: Firebucket simmering stove w/ tealight
MYOG Teelichtbrenner für filigrane Bastler German site
bplite.com 1850 - discussion on tealight options.
Note - This type is just one of many DIY alcohol stove options. For more information on different options visit Zen and the Art of the Alcohol Stove and the Templates page.
